eBPF/XDP (2) How to run samples on Virtual Network
이 포스팅은 BPF and XDP Reference Guide 를 실습할 시 호스트 네트워크 대신 가상 네트워크를 생성하여 실습하도록 유도하는 것이 목적입니다. 만약 eBPF/XDP를 처음 배우는 분들이라면 이 포스팅부터 따르기 보단 먼저 xdp-project/xdp-tutorial 를 학습하는 것을 권장합니다. XDP를 이용한 필터링, 재작성, 리다이렉션 등 필수 예제들을 쉽게 따라할 수 있습니다.
Overview
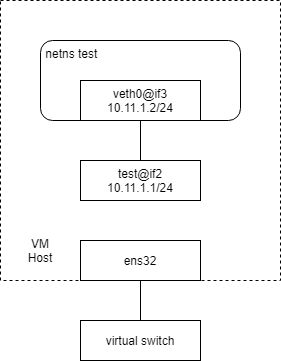
Ubuntu 20.04.2 를 설치한 VM에서 실습을 진행합니다. 처음에는 18.04.5로 진행하였으나 iproute2 4.15 버전이 bpf_elf.h 를 포함하고 있지 않은 문제가 있었습니다. Ubuntu 20.04.2의 iproute2 버전은 5.4 입니다. VMware NAT network 와 연결된 ens32 으로 ssh 원격 접속합니다. ‘test’라는 이름을 가진 netns 하나를 생성하고, 그 다음 호스트 영역과 netns를 연결하기 위하여 veth (virtual ethernet) pair 를 생성합니다. 이후 우리는 호스트 영역의 veth ‘test’와 netns 영역의 veth ‘veth0’ 에 대하여 xdp 또는 tc 를 붙여 네트워크를 프로그래밍 할 수 있게 됩니다. 다만 생성된 가상 네트워크는 외부와 통신할 수 없습니다. 보통 이를 연결하기 위하여 가상 브리지를 생성하고 포트에 veth를 붙이지만 실습 중에는 외부와의 연결이 필요하지 않기 때문에 실시하지 않습니다.
이하 과정은 모두 root 권한을 가지고 수행하였습니다.
Install Dependencies
eBPF 바이트 코드를 빌드하는 데에 필요한 package dependencies 를 설치합니다.
apt-get install -y make gcc libssl-dev bc libelf-dev libcap-dev \
    clang gcc-multilib llvm libncurses5-dev git pkg-config libmnl-dev bison flex graphviz tree linux-tools-generic
Generate Virtual Network
testenv.sh 을 얻기 위해 xdp-project/xdp-tutorial 의 소스를 가져옵니다.
cd
git clone https://github.com/xdp-project/xdp-tutorial
그 다음 아래와 같이 실행하여 testenv.sh 에 대한 추천 alias를 얻습니다.
cd xdp-tutorial
./testenv/testenv.sh alias
출력은 다음과 같습니다.
# ./testenv/testenv.sh alias
Eval this with `eval $(./testenv/testenv.sh alias)` to create shell alias

alias t='/root/xdp-tutorial/testenv/testenv.sh'
아래 출력된 alias를 .bashrc 에 등록하여 지속적으로 사용하겠습니다.
echo "alias t='/root/xdp-tutorial/testenv/testenv.sh'" >> ~/.bashrc
로그아웃/인 또는 재부팅한 뒤 t 를 실행합니다.
# t
Usage: /root/xdp-tutorial/testenv/testenv.sh [options] <command> [param]

Commands:
setup                   Setup and initialise new environment
teardown                Tear down existing environment
reset                   Reset environment to original state
exec <command>          Exec <command> inside test environment
enter                   Execute shell inside test environment
ping                    Run ping inside test environment
alias                   Print shell alias for easy access to this script
status (or st)          Show status of test environment
load                    Load XDP program on outer interface
unload                  Unload XDP program on outer interface
tcpdump                 Run on outer interface (or inner with --inner)
stats                   Run the XDP statistics program
redirect <env1> <env2>  Setup redirects for packet03 lessons

Use --help to see the list of options
testenv.sh 을 사용할 준비가 되었습니다. 예를 들어 이름 ‘test’를 가진 netns를 생성하려면 아래와 같이 실행합니다.
t setup -n test --legacy-ip
--legacy-ip 옵션은 IPv4 사용을 위해 포함합니다. 이 옵션이 없으면 IPv6 주소만 할당되고 IPv4로 통신할 수 없습니다.
호스트 veth ‘test’는 다음과 같이 생성되었습니다.
# ip addr show dev test
3: test@if2: <BROADCAST,MULTICAST,UP,LOWER_UP> mtu 1500 qdisc noqueue state UP group default qlen 1000
    link/ether 7a:7b:17:94:72:14 brd ff:ff:ff:ff:ff:ff link-netns test
    inet 10.11.1.1/24 scope global test
       valid_lft forever preferred_lft forever
    inet6 fc00:dead:cafe:1::1/64 scope global
       valid_lft forever preferred_lft forever
    inet6 fe80::787b:17ff:fe94:7214/64 scope link
       valid_lft forever preferred_lft forever
‘test’ netns의 veth ‘veth0’는 다음과 같이 생성되었습니다. 다음과 같이 t exec -n <netns> -- <command> 를 이용하여 netns 내부에서 명령을 실행할 수 있습니다.
# t exec -n test -- ip addr show dev veth0
2: veth0@if3: <BROADCAST,MULTICAST,UP,LOWER_UP> mtu 1500 qdisc noqueue state UP group default qlen 1000
    link/ether ce:02:03:45:26:9a brd ff:ff:ff:ff:ff:ff link-netnsid 0
    inet 10.11.1.2/24 scope global veth0
       valid_lft forever preferred_lft forever
    inet6 fc00:dead:cafe:1::2/64 scope global
       valid_lft forever preferred_lft forever
    inet6 fe80::cc02:3ff:fe45:269a/64 scope link
       valid_lft forever preferred_lft forever
ping 을 보내 연결 상태를 확인합니다. 두 가지 방법 중 편한 것을 사용하면 됩니다.
ping 10.11.1.1
t ping -n test --legacy-ip
출력은 다음과 같습니다.
# t ping -n test --legacy-ip
Running ping from inside test environment:

PING 10.11.1.1 (10.11.1.1) 56(84) bytes of data.
64 bytes from 10.11.1.1: icmp_seq=1 ttl=64 time=0.015 ms
64 bytes from 10.11.1.1: icmp_seq=2 ttl=64 time=0.026 ms
64 bytes from 10.11.1.1: icmp_seq=3 ttl=64 time=0.026 ms
^C
--- 10.11.1.1 ping statistics ---
3 packets transmitted, 3 received, 0% packet loss, time 2057ms
rtt min/avg/max/mdev = 0.015/0.022/0.026/0.006 ms
xdp-example.c
BPF and XDP Reference Guide 에 소개된 xdp-example.c 는 다음과 같습니다.
#include <linux/bpf.h>

#ifndef __section
# define __section(NAME)                  \
    __attribute__((section(NAME), used))
#endif

  __section("prog")
int xdp_drop(struct xdp_md *ctx)
{
  return XDP_DROP;
}

char __license[] __section("license") = "GPL";
헤더 linux/bpf.h 는 구조체 xdp_md, enum XDP_DROP 의 정의를 포함하고 있습니다. 소스 코드를 간단히 해석하면 “들어온 데이터를 전부 DROP 하라” 입니다.
소스를 빌드한 뒤 xdp-example.o 를 veth ‘test’ 에 attach 합니다.
clang -O2 -Wall -target bpf -c xdp-example.c -o xdp-example.o
ip link set dev test xdp obj xdp-example.o
동일하게 ping 을 보내봅니다.
# t ping -n test --legacy-ip
Running ping from inside test environment:

PING 10.11.1.1 (10.11.1.1) 56(84) bytes of data.
^C
--- 10.11.1.1 ping statistics ---
14 packets transmitted, 0 received, 100% packet loss, time 13309ms
xdp에 의해 네트워크가 차단되었음을 알 수 있습니다. 원 상태로 복귀하기 위해 다음을 입력하여 xdp를 detach 합니다.
ip link set dev test xdp off
그리고 다시 ping 을 날려봅니다.
# t ping -n test --legacy-ip
Running ping from inside test environment:

PING 10.11.1.1 (10.11.1.1) 56(84) bytes of data.
64 bytes from 10.11.1.1: icmp_seq=1 ttl=64 time=0.014 ms
64 bytes from 10.11.1.1: icmp_seq=2 ttl=64 time=0.025 ms
^C
--- 10.11.1.1 ping statistics ---
2 packets transmitted, 2 received, 0% packet loss, time 1023ms
rtt min/avg/max/mdev = 0.014/0.019/0.025/0.007 ms
네트워크가 다시 정상적으로 연결되었음을 알 수 있습니다. 이처럼 xdp를 이용하면 네트워크 토폴로지 및 UP/DOWN 상태를 변경하지 않고도 패킷을 쉽게 필터링할 수 있음을 알 수 있습니다.
tc-example.c
BPF and XDP Reference Guide 에 소개된 tc-example.c는 다음과 같습니다.
#include <linux/bpf.h>        // struct __sk_buff
#include <linux/pkt_cls.h>    // TC_ACT_OK
#include <stdint.h>           // uint32_t
#include <iproute2/bpf_elf.h> // bpf_elf_map

#ifndef __section
# define __section(NAME)                  \
  __attribute__((section(NAME), used))
#endif

#ifndef __inline
# define __inline                         \
  inline __attribute__((always_inline))
#endif

#ifndef lock_xadd
# define lock_xadd(ptr, val)              \
  ((void)__sync_fetch_and_add(ptr, val))
#endif

#ifndef BPF_FUNC
# define BPF_FUNC(NAME, ...)              \
  (*NAME)(__VA_ARGS__) = (void *)BPF_FUNC_##NAME
#endif

static void *BPF_FUNC(map_lookup_elem, void *map, const void *key);

struct bpf_elf_map acc_map __section("maps") = {
  .type           = BPF_MAP_TYPE_ARRAY,
  .size_key       = sizeof(uint32_t),
  .size_value     = sizeof(uint32_t),
  .pinning        = PIN_GLOBAL_NS,
  .max_elem       = 2,
};

static __inline int account_data(struct __sk_buff *skb, uint32_t dir)
{
  uint32_t *bytes;

  bytes = map_lookup_elem(&acc_map, &dir);
  if (bytes)
    lock_xadd(bytes, skb->len);

  return TC_ACT_OK;
}

  __section("ingress")
int tc_ingress(struct __sk_buff *skb)
{
  return account_data(skb, 0);
}

  __section("egress")
int tc_egress(struct __sk_buff *skb)
{
  return account_data(skb, 1);
}

char __license[] __section("license") = "GPL";
소스코드는 다음과 같은 구조를 가지고 있습니다.
- BPF 맵
- 패킷 카운터. BPF 맵에 저장.
- Ingress
- Egress
BPF 맵은 global pinned 되어 /sys/fs/bpf/globals/acc_map 에 위치하며, tc-ingress 와 tc-egress 가 이를 공유하여 사용합니다. 엔트리 개수는 2개이며, key 0을 가진 엔트리는 ingress, key 1을 가진 엔트리는 egress를 위한 것입니다.
동작 흐름은 다음과 같습니다.
- 패킷이 hook 지점을 지나면 account_data를 호출
- map_lookup_elem로 value pointer bytes를 조회
- atomic operation 으로 bytes가 가리키는 메모리값에 패킷 크기 skb->len을 더함. 즉, 패킷 데이터 양을 누적.
- TC_ACT_OK를 리턴하여 패킷을 다음 레벨로 통과시킴.
소스를 빌드하고 나온 tc-example.o 를 tc-ingress, tc-egress에 각각 attach 하겠습니다.
# build
clang -O2 -Wall -target bpf -c tc-example.c -o tc-example.o

t setup -n test --legacy-ip
tc qdisc add dev test clsact

# attach section ingress on tc-ingress
tc filter add dev test ingress bpf da obj tc-example.o sec ingress

# attach section egress on tc-egress
tc filter add dev test egress bpf da obj tc-example.o sec egress

# check tc ingress status
tc filter show dev test ingress

# check tc egress status
tc filter show dev test egress
그 다음 global pinned 된 map 의 생성을 확인하겠습니다.
# tree /sys/fs/bpf
/sys/fs/bpf
├── ip -> /sys/fs/bpf/tc/
├── tc
│   └── globals
│       └── acc_map
└── xdp -> /sys/fs/bpf/tc/
bpftool 을 이용하여 맵의 내부를 조회해보겠습니다.
# bpftool map show
1: array  flags 0x0
	key 4B  value 4B  max_entries 2  memlock 4096B
생성된 맵의 id는 1입니다. 다음 명령을 통해 맵 내부를 확인할 수 있습니다.
# bpftool map dump id 1
key: 00 00 00 00  value: 00 00 00 00
key: 01 00 00 00  value: 00 00 00 00
Found 2 elements
아직은 netns 로 트래픽이 인가되지 않았기 때문에 value 값이 비어있는 것을 볼 수 있습니다. 참고로 값은 little endian 으로 메모리에 작성됩니다. Big endian 을 사용하는 network byte order 와 잘 구분할 필요가 있습니다.
5개의 ping 을 전달한 뒤 맵을 조회하였습니다.
# t ping -n test --legacy-ip
Running ping from inside test environment:

PING 10.11.1.1 (10.11.1.1) 56(84) bytes of data.
64 bytes from 10.11.1.1: icmp_seq=1 ttl=64 time=0.040 ms
64 bytes from 10.11.1.1: icmp_seq=2 ttl=64 time=0.029 ms
64 bytes from 10.11.1.1: icmp_seq=3 ttl=64 time=0.028 ms
64 bytes from 10.11.1.1: icmp_seq=4 ttl=64 time=0.027 ms
64 bytes from 10.11.1.1: icmp_seq=5 ttl=64 time=0.027 ms
^C
--- 10.11.1.1 ping statistics ---
5 packets transmitted, 5 received, 0% packet loss, time 4088ms
rtt min/avg/max/mdev = 0.027/0.030/0.040/0.005 ms

# bpftool map dump id 1
key: 00 00 00 00  value: ea 01 00 00
key: 01 00 00 00  value: ea 01 00 00
Found 2 elements
BPF 맵에 데이터가 작성되어 있습니다. 누적 데이터 값은 0x1ea(490) 으로, 패킷 하나당 98 (98 * 5 = 490)이 카운트 되었음을 알 수 있습니다. (이는 이더넷 프레임 헤더와 FCS를 제외한 크기입니다.) tcpdump 를 통해 BPF 맵이 정확히 작성되었음을 추가 검증할 수 있습니다.
# t tcpdump
tcpdump: verbose output suppressed, use -v or -vv for full protocol decode
listening on test, link-type EN10MB (Ethernet), capture size 262144 bytes
01:39:59.843748 ce:02:03:45:26:9a > 7a:7b:17:94:72:14, ethertype IPv4 (0x0800), length 98: 10.11.1.2 > 10.11.1.1: ICMP echo request, id 7089, seq 15, length 64
...
“ethertype IPv4 (0x0800), length 98” 과 tc 가 캡쳐한 패킷 크기가 일치함을 알 수 있습니다.
netns test 삭제
다음 명령을 통해 실습에 사용한 netns 를 제거할 수 있습니다.
t teardown -n test
Wrap Up
BPF and XDP Reference Guide 의 두 샘플 코드 xdp-example.c 와 tc-example.c 를 빌드하고 각각을 직접 인터페이스에 붙여 동작을 확인해 보았습니다. 보통 BPF map 데이터는 user program 을 이용하여 조회합니다. 만약 user가 BPF 맵에 접근할 수 있는 권한이 있다면 어떠한 프로그래밍 언어를 사용하더라도 문제없이 조회가 가능합니다.
Languages
- C: xdp-project/xdp-tutorial
- Python: Netronome/bpf-samples
- Go: dropbox/goebpf